A reliable ham radio programming guide should start with the radio and the repeater data, not with the software. Confirm the exact radio variant, choose CHIRP or front-panel entry based on what that radio supports, and verify the repeater’s output, offset, and access tone before saving anything. Program and test one channel first, keep a clean backup, then build the rest of the memory list from that known-good example. By the end, you should know which programming path fits your radio and how to avoid the settings that make a correctly powered radio seem broken.
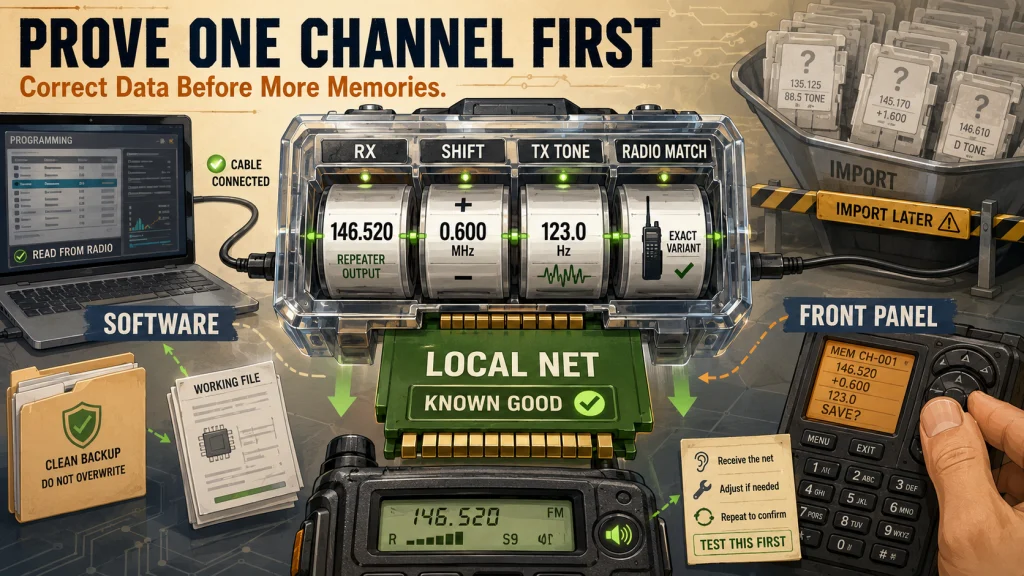
Programming Is a Data Problem Before It Is a Software Problem
A useful ham radio programming guide has to begin with the mistake that causes most wasted effort: treating software installation as the whole job. If you are learning how to program ham radio memories, the harder part is usually deciding which frequency the radio should receive, where it should transmit, which access setting the repeater expects, and whether the selected workflow matches the exact radio in your hand.
I often meet new licensees who passed the exam, bought a radio, and still have not made a contact because the memory list was copied from somewhere without being understood. The screen may show a familiar repeater frequency, yet the radio can still be transmitting simplex, sending the wrong tone, filtering the received audio, or using data that is no longer current. That is why the first goal is not to fill fifty memory slots. It is to create one channel you can explain and verify.
| What you observe | What may be wrong | What to check first |
|---|---|---|
| You hear the repeater but cannot access it | Wrong offset direction, offset amount, or transmit tone | Compare the saved transmit frequency and access tone with current repeater information |
| The radio shows the channel but no audio opens | An unnecessary receive tone may be filtering the signal | Test with carrier squelch or the receive setting specified by the repeater operator |
| The software cannot communicate with the radio | Wrong model selection, unsupported variant, cable, driver, port, or clone sequence | Verify the exact radio identity and its documented connection procedure |
| A large imported list produces uncertain results | Unverified or outdated records were loaded in bulk | Return to one nearby repeater and confirm each field individually |
This troubleshooting order matters because changing software rarely fixes incorrect repeater data. Start with the radio identity, then the source data, then the programming method, and only then the connection details. Readers who are still assembling the rest of the station can use the complete ham radio setup path to keep programming, antenna placement, operating practice, and hardware troubleshooting in their proper lanes.
Choose Software or Front-Panel Entry by Radio, Not Preference
Ham radio programming software is usually faster when you need many memories, consistent names, repeatable backups, or settings that are difficult to reach through a small menu. Front-panel entry is often better when you need one channel immediately, cannot install software, do not have the correct cable, or the radio is not supported by the software you intended to use. Neither method is more legitimate. The safer method is the one documented for the exact radio and task.
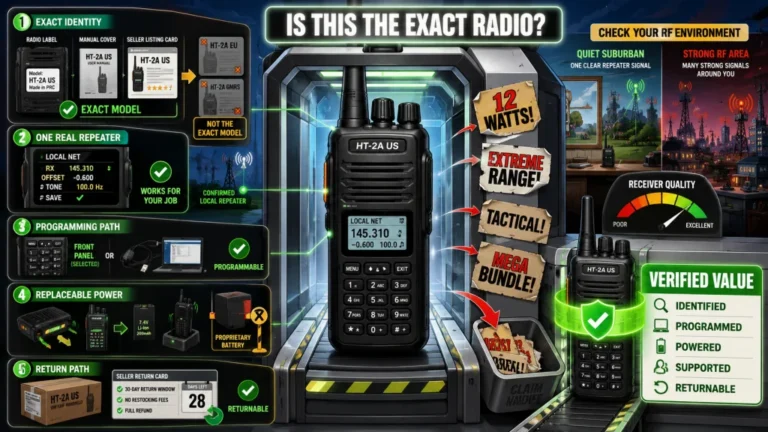
The first check is the complete radio identity, including any suffix or hardware variant. Radios with nearly identical cases can use different firmware, memory structures, cable wiring, or supported workflows. Selecting a similar name because it looks close is not a harmless shortcut when software is writing an entire configuration back to the device.
Use software when it reduces repetitive work without adding model uncertainty. Use the front panel when it gives you a controlled path to one verified memory or when the manual requires it. The decision should reduce the number of assumptions between the repeater listing and the channel stored in the radio.

BTECH UV-5X3 is a programmable amateur handheld covering VHF, 1.25-meter, and UHF operation. BTECH provides a dedicated CHIRP workflow for programming its channel memories, including downloading from the radio before editing. The radio uses 128 channels and comes with separate dual-band and 220 MHz antennas.
Check On AmazonIf you click this link and buy, we earn a commission at no additional cost to you.
CHIRP Ham Radio Programming Starts with Support and a Backup
Evidence status: Research-based. Confirm every transfer step against current CHIRP documentation and the exact radio manual before writing to the radio.
CHIRP-next is the actively maintained branch of the software, but that does not mean every radio, variant, or feature is supported in the same way. Check the current supported-model information for the exact radio before connecting it. A model appearing on a list does not guarantee that every menu setting, accessory, firmware revision, or regional variant behaves identically.
The most important CHIRP habit is to download from the radio before building or importing a memory list. That first download creates a radio-specific working image for clone-mode devices and confirms that the computer, port, cable, radio selection, and transfer sequence can communicate. Saving the untouched result gives you a clean reference before any edits are made.
- Confirm support: Match the full radio name and variant to current CHIRP support information.
- Verify the connection: Use the connector, cable type, driver, port, and clone sequence documented for that radio.
- Download first: Read the existing configuration from the radio rather than creating a generic file and uploading it blindly.
- Save a clean copy: Keep the first successful download unchanged and give it a date that is easy to recognize.
- Edit a working copy: Add one verified channel before importing a large list.
- Upload carefully: Follow the radio’s documented power, clone-mode, and transfer sequence without disconnecting midway.
- Read back and compare: Download again after the upload when practical so you can confirm what the radio retained.
A CSV file is useful for moving or editing memory data, but it is not a substitute for the radio-specific image or workflow required by many devices. Fields that make sense in one radio may be ignored, converted, limited, or represented differently in another. The detailed CHIRP programming workflow is the right next step when your exact radio is supported and you are ready to handle the connection and transfer process.
If the first download fails, stop before changing random drivers or trying repeated uploads. Recheck the model selection, physical connector, port, cable seating, radio mode, and the order of the clone steps in the manual. A programming cable is not a universal accessory merely because the plug fits, so compatibility has to be verified for the exact radio and connector type.

BTECH PC03 is a USB-A programming cable for radios using the Kenwood K1 accessory jack. Amazon lists a genuine FTDI chipset, plug-and-play operation, and compatibility with CHIRP. Supported radios listed by Amazon include models such as the BTECH UV-5X3, BAOFENG BF-F8HP, and UV-82HP.
Check On AmazonIf you click this link and buy, we earn a commission at no additional cost to you.
Front-Panel Entry Is Best Learned One Verified Channel at a Time
Evidence status: Research-based. Menu names, save sequences, and transmit-side behavior must be checked in the manual for the exact radio.
Front-panel programming is slower, but it forces the operator to understand what each setting does. That is useful when you are learning the difference between VFO mode and memory mode, or when you need to change a tone or add a nearby repeater away from a computer. The difficulty is that menu names and save sequences vary widely, so a generic button sequence should never replace the exact manual.
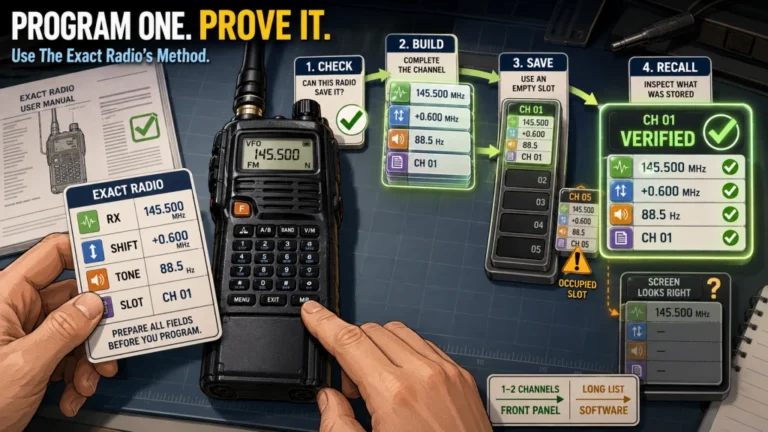
Start in the mode required by the manual and enter one repeater only. Confirm the receive frequency, shift direction, offset amount or transmit frequency, access tone or code, power level, and memory location before saving. Some radios require separate steps for the receive and transmit sides of a memory, while others calculate the transmit frequency from the shift and offset. Treat those as different workflows rather than assuming one keypad recipe applies to both.
Field Note: A common failure pattern is saving the receive frequency correctly while leaving the transmit side in simplex or on the wrong offset. The channel looks correct while monitoring, but it fails as soon as the push-to-talk button is pressed.
After saving, leave the programming screen and inspect the channel as an operator would use it. Watch the displayed frequency or transmit indicator while pressing push-to-talk only when you are ready to make an identified test. The guide to programming a radio without a computer can take you through the manual-entry decision without pretending every front panel uses the same sequence.

Radioddity GA-510 is a dual-band handheld that supports programming directly from its front keypad. Radioddity documents keypad entry for repeater receive frequency, transmit CTCSS tone, shift direction, frequency offset, and memory storage. The radio also supports CHIRP programming and includes a programming cable in the Amazon-listed package.
Check On AmazonIf you click this link and buy, we earn a commission at no additional cost to you.
Verify the Repeater Before You Program It
A repeater directory is a starting point, not proof that every field is current or that the system is active from your location. Compare the listing with the repeater owner’s club page, local frequency coordinator information where available, and recent local operating activity. A correct historical record can still lead to a silent channel if the machine has changed tone, moved, gone offline, or is no longer used regularly.
Monitor the output frequency before transmitting. Listen at different times if the repeater carries scheduled nets or commute-hour activity, and confirm whether the call sign or announcements match the system you intended to program. If the listing and the repeater owner’s current information disagree, use the information maintained by the responsible local source or ask the group that operates it.
The most efficient first choice is not always the nearest pin on a map. Elevation, terrain, buildings, antenna position, and repeater activity can make a slightly farther system more useful than a closer silent one. Pick one active repeater that you can hear clearly, then use it as the test case for the radio and programming method.
Import tools can save time later, but importing every nearby record before checking any of them turns unknown data into a full memory bank of unknown channels. The process for finding active ham radio repeaters explains how to narrow the list before programming begins.
Separate Output, Input, Offset, and Tone Before Saving
Most repeater programming mistakes come from mixing fields that describe different parts of the same path. The repeater output is the frequency your radio receives. The repeater input is the frequency your radio transmits to. The shift tells the radio whether that transmit frequency is above or below the receive frequency, and the offset amount tells it how far away the two frequencies are.
The access tone is another separate setting. A transmit CTCSS tone or DCS code may be required for the repeater receiver to accept your signal. A receive tone setting controls when your own speaker opens. Those two jobs are easy to confuse, and adding tone squelch when the repeater does not transmit the matching tone can make a working channel sound completely silent.
| Programming field | What it controls | Common mistake |
|---|---|---|
| Receive or output frequency | Where your radio listens to the repeater | Entering the repeater input as the main channel frequency |
| Shift direction | Whether transmit is above or below the receive frequency | Choosing plus when the repeater requires minus, or leaving simplex selected |
| Offset amount | The spacing between receive and transmit frequencies | Using a familiar default without checking the actual system |
| Transmit tone or code | Allows the repeater receiver to recognize the signal when access control is used | Entering the right value in a receive-only field |
| Receive tone or code | Filters what opens your radio’s speaker | Enabling it when the repeater does not transmit the same value |
| Digital access settings | Selects the required digital network parameters | Treating digital voice as if frequency and one analog tone are sufficient |
For an analog repeater, write the receive frequency, transmit frequency, access tone, and receive-tone behavior on paper before opening any software menu. If the radio uses shift and offset instead of a direct transmit frequency, calculate what it should transmit and compare that result with the repeater input. That quick cross-check catches a sign error before it becomes a mystery on the air.
Digital voice systems may add protocol-specific fields such as network identifiers, channel assignments, or group selections. This article does not turn those systems into one generic codeplug procedure because the required data and software differ. The repeater offset and CTCSS tone guide handles the analog field relationships in more detail.
Validate One Channel Without Repeated Kerchunking
Evidence status: Research-based. Follow current FCC identification requirements and the operating practices of the repeater system you are testing.
Once the first memory is saved, monitor before transmitting. Confirm that the channel opens on expected activity and that you are hearing the intended repeater rather than a signal on the same output frequency from another area. Use the lowest power that can reach the system reliably, especially when you are close enough that full power adds no practical benefit.
A brief test transmission still needs proper station identification. Rather than pressing push-to-talk repeatedly with no voice, give your call sign and state that you are testing or requesting a radio check. Repeated kerchunking does not confirm audio quality, creates unidentified transmissions, and can irritate everyone monitoring the repeater without telling you which programming field is wrong.
- Listen long enough to confirm the frequency is not in active use.
- Check that the radio is on the saved memory, not a similar VFO entry.
- Use low power for the first test when the repeater is clearly reachable.
- Identify with your call sign and make one clear request for a radio check.
- Listen for the repeater response, courtesy tone, identification, or another operator’s reply.
- If the test fails, stop transmitting and recheck the saved transmit frequency and access setting.
A repeater tail or courtesy tone can show that the system responded to a carrier, but it does not prove that your audio is clear or that every memory field is correct. A reply from another operator is a better validation because it confirms both access and intelligibility. Once one repeater works, the next task is learning the local operating rhythm rather than filling more memories immediately.

BAOFENG BF-F8HP is a dual-band VHF/UHF handheld with three selectable power levels. Amazon lists High, Medium, and Low settings at 8W, 4W, and 1W, providing a low-power option for initial repeater testing. The package includes the radio, battery, dual-band antenna, charger, earpiece, belt clip, wrist strap, and user manual.
Check On AmazonIf you click this link and buy, we earn a commission at no additional cost to you.
Build a Memory Plan You Can Understand Six Months Later
A radio with hundreds of memory slots does not need hundreds of entries on the first day. Start with channels that have a known purpose: one or two active local repeaters, a local simplex calling frequency where appropriate, and any event or travel channels you have independently verified. A smaller trusted list is easier to scan and troubleshoot than a large import whose labels and settings you do not recognize.
Name memories by location or purpose rather than by frequency alone. A label such as a town, repeater call sign, net name, or route gives the operator a reason to select the channel. Keep names short enough to remain distinguishable on the radio’s display, and avoid several nearly identical abbreviations that only make sense on the computer screen.
Maintain two files when the programming method permits it: a clean baseline and a current working copy. The baseline should contain a known-good radio read and verified core channels. The working copy can hold later edits, travel groups, scan changes, or experiments. Add a date and a short change note so you can tell which file restored a working configuration and which one introduced a problem.
Key point: Do not edit the only known-good file. Preserve it, duplicate it, and make changes to the copy.
Document any unusual tone mode, nonstandard offset, digital setting, or channel that came from a temporary event. Memory organization is not clerical work. It is what allows you to repair the setup without starting from zero when a repeater changes or the radio is reset.
Final Thoughts: Prove One Channel Before Building the List
The programming problems that keep new operators off the air are rarely solved by loading more channels. The reliable sequence is smaller: identify the exact radio, choose a supported programming path, verify one active repeater, separate receive and transmit data, save a backup, and test with proper identification. Each step removes one unknown before the next is added.
Once that first repeater works, use it. Listen to the local pattern, learn when the nets meet, and move from a technical test to a normal contact. The guide to making your first repeater contact continues from the point where programming ends and operating begins.
Explore More Radio Programming Guides
Each programming method has a different failure point, so use the guide that matches the part of the process blocking you now. Software connection, manual entry, repeater selection, and tone interpretation are easier to solve separately than as one oversized troubleshooting session.
| Guide | What it helps with |
|---|---|
| Using CHIRP Safely | Checks model support, establishes the download-first workflow, preserves backups, and handles radio-to-computer transfers. |
| Front-Panel Radio Programming | Builds one memory from the exact manual when software or a compatible cable is unavailable. |
| Finding Local Repeaters | Verifies activity, ownership information, location, and current access data before a directory list is imported. |
| Offsets and Access Tones | Separates repeater output, input, shift, offset, transmit tone, and receive squelch settings. |
Start with the guide that resolves your first unknown, then return to the one-channel validation process before expanding the memory list.
FAQs
💻 Do I need CHIRP to program a ham radio?
No. Use CHIRP only when the exact radio and variant are supported. Manufacturer software or front-panel entry may be required or safer for radios that use a different memory structure or transfer procedure.
📻 How do I program a repeater into a ham radio?
Enter the repeater output as the receive frequency, then set the required transmit frequency through the correct shift and offset or a direct split. Add the transmit tone or code the repeater requires, save the memory, and verify what the radio transmits before making an identified test.
🔌 Why will my programming cable not connect?
Check the exact radio variant, connector type, cable compatibility, driver, computer port, radio mode, and transfer sequence. A plug fitting the radio does not prove the cable electronics or wiring are correct for that model.
📡 Why can I hear a repeater but not transmit through it?
The saved transmit side may have the wrong shift direction, offset amount, direct input frequency, or access tone. Confirm the repeater’s current input data and inspect what the radio does when push-to-talk is pressed.
🔇 Why does a programmed channel receive no audio?
An incorrect receive tone or code may be keeping the speaker closed even though the repeater signal is present. Test with carrier squelch or the receive setting documented by the repeater operator before changing unrelated fields.
🗂️ Should I import every repeater near me?
Not at first. Verify one active repeater, prove the programming workflow, and then add channels that have a real purpose. A smaller known-good list is easier to use and repair than a large unverified import.
📢 Can I key the repeater briefly just to test it?
Make an identified voice test instead of repeatedly kerchunking. Listen first, use your call sign, state that you are testing or requesting a radio check, and stop to troubleshoot if the repeater does not respond as expected.